
HOISTS USER MANUAL
1.- Important
Before using the hoist, read this manual and discuss it with an expert who can explain in detail how to operate the hoist and sling.
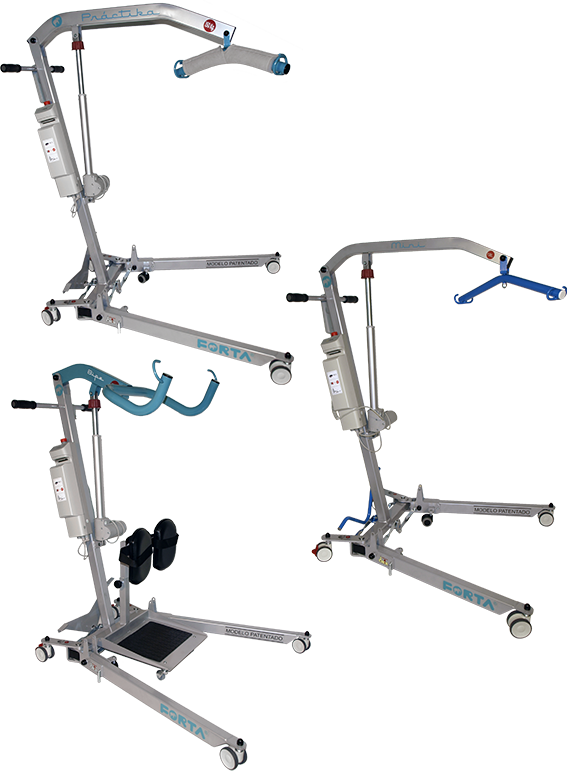
Our Practika, Mini, and Stand up personal hoists are designed to offer the greatest stability and comfort in use.
They have a double spreader bar system that opens the front and rear legs when in use. This system gives more stability for lifting.
The rear and front legs of our hoists fold for space-saving storage when not in use.
These improvements have been patented by FORTA, so only our hoists can offer you these great advantages.
Our Forta hoists comply with the European Medical Devices Directive 93/42/EEC and are therefore CE marked. They have been approved by the Institute of Biomechanics of Valencia (IBV) and meet the requirements of ISO 10535 "Hoists for the transfer of disabled persons. Requirements and test methods”.
All our hoists are rigorously tested at the factory to confirm that they work correctly.
2.- Icons used on the label and in the manual
 |
Manufacturer details |  |
Date of manufacture |
 |
Medical Device |  |
Observe safety instructions |
 |
Maximum user weight in kg | Declaration of Conformity | |
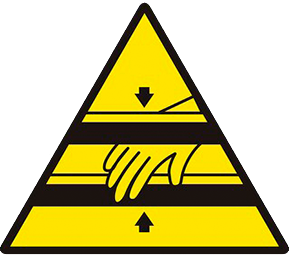 |
Caution, danger of entrapment |  |
Check the user manual |
 |
Product recycling information |  |
Recycling centre |
| SN | Product serial number | LOT | Product batch number |
| REF | Product reference or code |
|
Manufacturer details |
|
Date of manufacture |
|
Medical Device |
|
Observe safety instructions |
|
Maximum user weight in kg |
| Declaration of Conformity | |
|
Caution, danger of entrapment |
|
Check the user manual |
|
Product recycling information |
|
Recycling centre |
| SN | Product serial number |
| LOT | Product batch number |
| REF | Product reference or code |
3.- Product use
Hoists are aids that facilitate the transfer and/or standing of individuals with disabilities. Thanks to supports and slings for lifting and/or standing.
4.- Product description
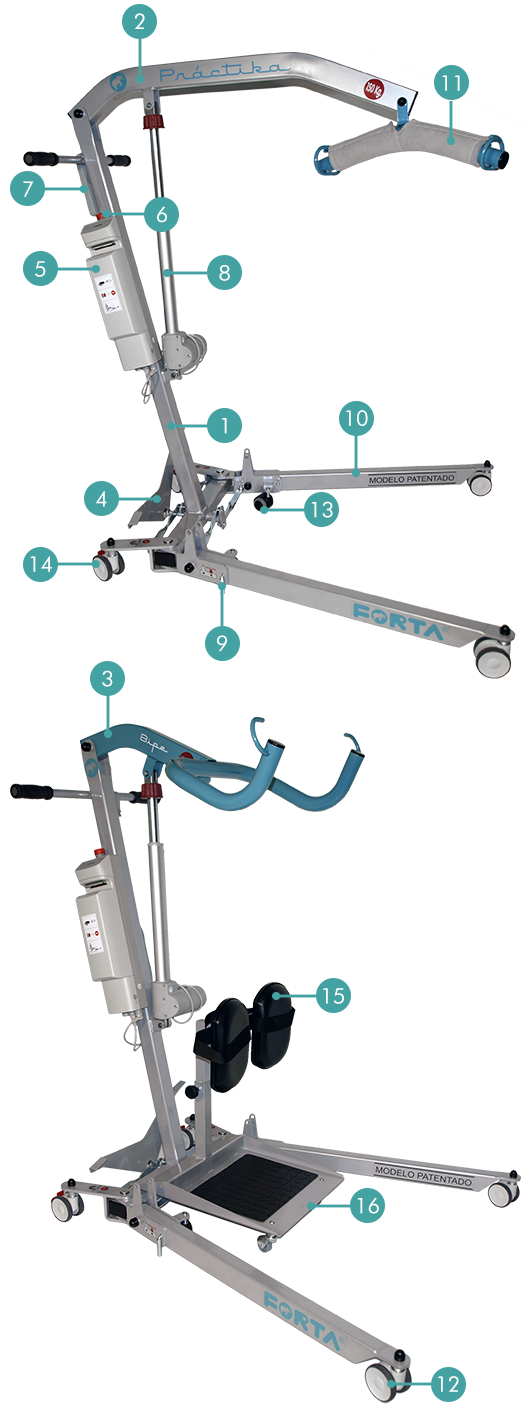
1. Stem 2. Lifting arm 3. Standing arm 4. Pedal 5. Control box 6. Emergency stop button 7. Control 8. Actuator 9. Leg lock 10. Leg 11. Sling bar 12. Outer wheel 13. Inner wheel 14. Wheel with brake 15. Standing knee pad 16. Standing platform
| Model identification | |
| Model | Description |
| Practika Hoist | Foldable electric personal lifting hoist for loads up to 150 kg. |
| Stand up Hoist | Foldable electric Stand up hoist for loads up to 150 kg. |
| Mini Hoist | Foldable electric personal lifting hoist for loads up to 130 kg. |
5.- Warnings and safety
Failure to follow these safety precautions may result in serious injury.
- Do not exceed the maximum weight capacity of 150 kg for the Practika and Stand up Hoists and 130 kg for the Mini Hoist.
- Before using your hoist, check that all components are working properly.
- Before using your hoist for the first time, it is advisable to charge the batteries for 10-24 hours.
- Check that the patient’s weight does not exceed the maximum weight for the hoist. The maximum weight is shown on the end of the arm.
- Do not apply the brakes to the rear wheels when lifting the patient.
- Always move the hoist using the handles. Do not push on the stem or the patient.
- Transfer the patient at the lowest height possible, i.e. as close to the floor as possible.
- Push the patient in the hoist slowly. Make turns with the hoist smoothly, without jerking.
- Do not use the loaded hoist on surface that slopes side-to-side at more than 4 degrees. Two people are needed to move a patient on a slope.
- Do not leave the patient lifted in the hoist.
- Do not use the hoist in damp environments.
- Do not charge the battery in an environment that is not dry.
- Use the hoist on ground that is level, clean and dry.
- Do not cross obstacles higher than 10 mm when the patient is in the hoist.
- Ensure that the front leg locking pins are correctly positioned before manoeuvring the hoist.
- Do not allow the patient to swing.
- Do not load the patient on the sling bar on one side. Ensure that the sling is securely fastened on both sides of the sling bar.
- Changing from the lifting arm to standing on the Mini lift is not allowed in any circumstances.
- Do not use a sling that is not approved or from a manufacturer other than Forta.
- Adjust the sling as described in the instructions.
- Check that the sling is the right size for the patient.
- Check the condition of the sling before each use.
- Do not wet the hoist or any of its components with water, acid, bleach or any other liquid. It could damage the hoist’s mechanical and/or electrical components.
6.- Assembly and use
The hoist does not require assembly. It is shipped folded in its packaging. Normal operation of the hoist (folding, unfolding, opening of legs, etc.) does not require the use of any tools.
You can see how to use the hoist in the videos at the following links:
- Lifting hoist (Practika o Mini): https://www.fortasl.es/en/hoists/lifting/practika-hoist
- Stand up hoist: https://www.fortasl.es/en/hoists/stand-up/stand-up-hoist
To use the hoist you will need to refer to the sling manual, which you can do here: https://www.fortasl.es/en/manuals/?s=lifting-sling
The assembly and use of the hoists and their components is detailed below:
Fold and unfold
To unfold the hoist's legs, follow the instructions below:
- Rotate the lock on one of the arms until it is facing upwards and take it out. The leg will be loose, hold on to it as it falls to rest on the ground.
- Insert the lock through the arm until the end comes out on the opposite side and then turn it to lock the leg. Make sure that the leg is locked and cannot be raised.
- Repeat for the other leg.
To fold the hoist’s legs, follow the instructions below:
- Rotate the lock on one of the legs until it is facing upwards and take it out. The leg will be loose, raise it to 90° to the ground and line up the hole in the lock with the hole in the base of the hoist.
- Insert the lock through the hole in the hoist base and leg, until the end of the lock comes out on the other side, locking the leg completely and securing it to the hoist.
- Repeat for the other leg.
Chassis width adjustment
- Stand behind the hoist.
- Open the legs by grasping the hoist handles and pressing the bottom right pedal. The front and back legs will open.
- Bring the legs closer together by holding the hoist handles and pressing the lower left pedal, the front and rear legs will get closer to each other.
Wheel brakes
- Stand behind the hoist.
- Grasp the hoist handles and press the lever above the rear wheels to lock them.
- To unlock, press the lever on the wheels upwards.
Warning: The wheels must always be unlocked to raise or lower the hoist boom with a person in the sling so that the hoist can move towards the centre of gravity of the line of lifting. If the brakes are locked, the patient will move towards the centre of gravity with consequent discomfort and danger.
Emergency stop button
There is a red button on the top of the control box that cuts off the power supply to the hoist. Power can only be restored by turning the red button in the direction of the arrows on it.
Lifting and lowering the patient
Ensure that the leg pins are correctly inserted through both holes right through the legs and are locked.
Raising and lowering of the arm is by means of an electric motor operated by a simple manual control (control box). The control box has two buttons with UP and DOWN arrows. The actuator stops automatically when it reaches its limit in either direction or if the load exceeds the weight-bearing capacity of the boom. The top LED on the control box will light up if the actuator is overloaded.
The control box has a battery charge indicator which shows how much charge the batteries have. When the red light is seen, it means that the battery is at its minimum charge and there is a risk of damage to the battery. Stop using the hoist and charge the hoist before using it again.
If the control malfunctions, the control box has up and down buttons to operate the hoist's boom.
Lowering the patient without electricity
If the hoist does not lower the patient because they are too heavy or there is no electricity, the electric actuator has a failsafe system for lowering the patient:
Press the red plastic toggle at the upper end of the stem of the electric motor down and turn it clockwise. The stem will retract and lower the patient.
Moving the hoist
- Stand behind the hoist and grip the handles tightly.
- Open the legs as described under "Chassis width adjustment" above.
- Unlock the wheels of hoist as described under "Wheel brakes" above.
- Push the hoist and turn it to the desired direction. The hoist has swivelling wheels at the front and back for ease of handling.
Control box assembly
The control box is installed on the hoist. Assembly instructions are attached if needed:
Installing the battery box
The battery box is installed in the control box. Instructions for installation and removal are attached if needed:
Control box connections
Insert the connectors fully into their housings. Make sure that the connectors are correctly connected.
Charging the batteries and service life
Frequent heavy discharge reduces battery life. For optimum life, batteries should be charged as often as possible. The minimum charging time is 8 hours. If you use the hoist every day, we recommend charging the battery overnight. The control box automatically disconnects from the charger when the batteries are fully charged.
Charging requires the connectors to be positioned correctly. The hoist’s batteries are the only electrical component that needs continuous maintenance. Failure to follow the instructions above may mean that the batteries discharge to a level that does not allow full charging or where they are no longer useable.
The batteries are in the battery box. The control box beeps when the batteries need to be charged and you will see the red LED on the charge indicator on the control. When the control box beeps, complete the manoeuvre you are performing and stop using the hoist; the batteries are at their minimum charge level and if you continue to use them you could damage them. Charge the batteries as follows:
- Connect the charging cable to the charging socket on the bottom of the control box.
- Make sure that the red emergency button is not pressed.
- Connect the cable to the power supply (220 V).
- Approximate full charge time is 12 hours. The charger disconnects automatically.
- If the hoist is not being used, a full charge must be done every week to avoid damaging the batteries through normal loss of charge.
- When the battery is charged, disconnect the charging cable from the power supply first and then from the hoist..
Features of the electrical equipment
The control box has a safety mechanism that stops the actuator about every eight complete consecutive cycles performed without a break. At that point the equipment may not be used for a period so as not to damage the actuator. If more than eight consecutive cycles are performed without a break, the equipment may overheat and fail.
When the consecutive cycle limit is reached, it does not mean that the system has no charge. The system cannot be restarted for a period because it needs time to recover and not damage the equipment.
Do not use the hoist while the batteries are charging.
The life of the batteries depends on how much charge they lose each time they are used. They should not be allowed to become fully discharged.
Practical tips
- Charge the batteries at night if the hoist has been used during the day.
- Charge the batteries immediately when the warning beep sounds and the charge indicator on the control is red.
- Charge the batteries in a well-ventilated, dry room.
- Keep the hoist’s batteries fully charged.
- Do not allow the batteries to fully discharge because it will shorten their life.
- If the hoist is not used for long periods, charge the batteries regularly, weekly.
- Do not leave the charging cable plugged into the hoist if you are not going to charge the batteries immediately.
Troubleshooting
| PROBLEM | CAUSE | SOLUTION |
| Actuator does not work | Emergency stop button activated | Deactivate emergency stop button |
| Poor cable connection | Connect correctly | |
| Batteries out of charge | Charge batteries | |
| Faulty control unit | Replace control unit | |
| Actuator stops raising the patient | Weight exceeds weight limit | Reduce weight |
| Batteries out of charge (beeps) | Charge batteries |
Conversion of Practika hoist to Stand up hoist and vice versa
Using an optional accessory, our Practika hoist can be converted to Stand up and vice versa. We now explain how to change the boom to change the operation of the hoist. You can see a video of how to perform the conversion here: https://www.fortasl.es/en/hoists/special/lifting-and-stand-up-hoist
Steps to change the boom:
- Using the knobs, remove the existing boom from the hoist. Attach the other boom and all other components as shown in the picture.
- Consult your orthopaedic specialist before making the change because incorrect assembly can lead to malfunction.
- Once each piece is in place, tighten the knobs firmly until they lock into place.
- Once the knobs have been tightened and before connecting the motor, it should be possible to raise the boom by hand and it should fall under its own weight..
- Check daily that the knobs are tightly fastened.
- Important: Do not change the assembly sequence.
Installing the standing platform:
Install the footrest platform on the bottom crosspiece of the hoist, insert the two bolts with their nuts and tighten them with spanners from the pedal side, where the leg opening mechanism is located.
Tighten the nuts so that the footrest is fixed.
Insert the knee support tube into its housing and adjust the pads with the knob, so as to support upper part of the shins.
7.- Technical Specifications
Dimensions, load-bearing capacity and weights are listed below:
| PRACTIKA HOIST | ||
| MAXIMUM HEIGHT | TOTAL WIDTH | MAXIMUM LOAD |
| 1830mm | 970mm | 150kg |
| MOTOR | FOLDED HEIGHT | FOLDED WIDTH |
| 6000N | 1290mm | 530mm |
| TOTAL LENGTH | WEIGHT | MINIMUM SLING BAR HEIGHT |
| 1200mm | 39,50kg | 300mm |
| STAND UP HOIST | ||
| MAXIMUM HEIGHT | TOTAL WIDTH | MAXIMUM LOAD |
| 1650mm | 970mm | 150kg |
| MOTOR | FOLDED HEIGHT | FOLDED WIDTH |
| 6000N | 1290mm | 530mm |
| TOTAL LENGTH | WEIGHT | MINIMUM SLING BAR HEIGHT |
| 1200mm | 39,50kg | 9,50kg |
| MINI HOIST | ||
| MAXIMUM HEIGHT | TOTAL WIDTH | MAXIMUM LOAD |
| 1790mm | 905mm | 130kg |
| MOTOR | FOLDED HEIGHT | FOLDED WIDTH |
| 6000N | 1290mm | 540mm |
| TOTAL LENGTH | WEIGHT | MINIMUM SLING BAR HEIGHT |
| 1020mm | 37,00kg | 300mm |
8.- Care and maintenance
Failure to care for and maintain the product in perfect condition may lead to the risk of an accident.
Regular maintenance ensures that the hoist remains in optimum operating condition and that minor problems that could become more significant and lead to a breakdown can be identified and addressed in good time. Not only does it improve day-to-day safety, but it also saves time and money in the long run. Note: In the event of a breakdown, any repair should be carried out by a specialist provider (orthopaedics). General recommendations The following are some of the most common maintenance and upkeep activities for the hoist:
- Keeping the hoist clean and in perfect condition will enhance its performance and appearance.
- We recommend the use of maintenance products such as lubricating oils, spray cans, damp cloths, etc. and non-aggressive products such as neutral detergent or alcohol.
- Do not use solvents that could damage the hoist’s finish.
- We recommend regularly lubricating all moving parts of the hoist to improve operation and minimise wear and tear of those parts in everyday use.
- Do not allow dirt to build up on the moving parts of the hoist.
- We recommend not using the hoist in buildings or places with a high humidity (near the sea, indoor swimming pools, etc.) or in corrosive environments that could affect any components.
- Do not charge the hoist's batteries in a bathroom or shower room.
The table below shows how components should be looked after and how often:
| ACTION | FREQUENCY |
| Cleaning | Daily |
| Checking the tightness of screws, nuts and knobs | Daily |
| Leg locking | Daily |
| Brake condition | Weekly |
| Review of safety clips | Weekly |
| General inspection | Every 6 months |
| Presence of cracks | Monthly |
| Sling condition | Monthly |
9.- Recycling the product
When the product has become unusable and must be disposed of: The hoist is made of epoxy-coated steel sections, so please follow local recycling requirements and recommendations as to disposal. Rechargeable batteries that contain lead (Pb) must be recycled. They should be put in the containers for car battery recycling or entrusted to suitably licensed waste managers. In any event, we recommend that you ask your local waste management company or your nearest recycling centre for advice on disposal.
10.- Storing the product
If not correctly stored, the product may be damaged leading to the risk of an accident.
- Do not store this product for an extended period of time near a heat source or in the sun (e.g. in front of a window or near a radiator) or near a cold source.
- Keep the product away from flames and sparks.
- Store the product as follows:
- Store the product in a dry, cool place.
- Protect the product from dust and rust by packaging or bagging it.
- Store all removed parts or components together in one place so they do not get mixed up with anything else or get lost.
- Do not place any weight on any components (do not place heavy objects on the product or on any component).
- After extended storage, check that all moving parts of the hoist are in proper working order and have not been damaged.
- Check for signs of rust on joints, attachment points and on the moving parts of the hoist. If there is any rust, do not use the hoist and consult your distributor because rust might lead to the product breaking.
Pay special attention to the hoist’s batteries if it is going to be left unused for an extended period.
- Remove the battery from the hoist as described in "6.- Assembly and use" assembly "Assembly of the battery box".
- Make sure that the battery is fully charged before storing. If you store it with low charge, you may not be able to recharge the battery.
- Once the battery has been removed from the hoist, it can be stored in a place that meets the following requirements:
- A dry place. Avoid environments that are humid with a high risk of condensation (35-65% relative humidity).
- A place where the product is protected from falls, blows and impacts. Avoid exposure to sunlight which might cause the battery to overheat and might even cause it to explode.
- Away from areas where there are sources of heat. Being hot could cause the battery to catch fire.
- Do not store above 25°C. If batteries are at a temperature above 25°C when used, they might overheat and deteriorate more readily.
- When you want to use the battery again after storage, make sure before you connect it that the battery is not swollen or deformed, that the connections are not damaged and there is no rust or leakage around the connections. If you notice anything that is not as it should be, do not connect the battery because it could cause a fire or damage the electrical components of the hoist.
- Check that the battery has a high level of charge before using the hoist again after storage. We recommend a full charge before use.
- Once the battery is connected. Test that the hoist is working properly without a patient.
11.- Useful life
The expected useful life of the product is 1 year in normal conditions of use, safety and maintenance. After that time, the product can be used as long while it remains in perfect conditions of use and maintenance. Some parts or components may in any event have to be replaced due to normal wear and tear within less than this time.
12.- Warranty and after-sales service
Warranty terms and conditions:Only original Forta products purchased from authorised dealers are covered by the warranty against defects in parts and workmanship.
The warranty period runs from the date of purchase for 3 years for structure and components and 1 year for batteries, which are consumable items. The warranty is subject to the following conditions::
- Only original FORTA products purchased from authorised dealers will be covered by the warranty against defects in parts and workmanship.
- The purchasing establishment must give notice of any defect in the product immediately.
- The manufacturer will not have any liability for defects caused by improper handling, negligence or failure to follow the instructions set out in this manual.
- During the warranty period, any part that proves defective due to faulty assembly or materials will be repaired or replaced free of charge by Forta.
- The warranty will be absolutely void if incorrect modifications or adjustments are made to the product or if parts or options not supplied for the product model are fitted.
- Damage from rust caused by misuse or negligence or the action or any liquid or gas that may damage the product are excluded from the warranty.
THE WARRANTY DOES NOT COVER THE CONSEQUENCES OF ANY TRAVEL PROBLEM, IN PARTICULAR ISSUES RELATING TO TRANSPORT, LOSS OF PROFIT, EXPENSES, ETC.
Forta will have NO liability in the following circumstances:
- Normal wear and tear of the product or inappropriate or incorrect use.
- Defects in any assembly or repair carried out by the purchaser or a third party.
- Negligent handling or maintenance or use of unsuitable parts.
- Repairs or modifications carried out in non-official workshops.
- Forta will have no liability for any harm or loss suffered by the user or any third party as a result of any modification to or alteration of any product.
- The warranty also excludes modifications made other than with original Forta parts.
The warranty certificate must be sent to FORTA, S.L. together with a photocopy of the purchase invoice within 15 days from the date of purchase. To validate the warranty, the user must submit the warranty certificate bearing the stamp the seal of the outlet that sold the product. You can download the warranty certificate here: https://www.fortasl.es/manuals/doc/GARANTIA%20CONTRACTUAL.pdf.
13.- Tests and trials carried out
FORTA products comply with Annex IV to MDR (EU) , are CE marked and have been designed and tested in accordance with . Forta is obliged to certify compliance by its products with a number of essential requirements. There is a standard that specifies the inspection and testing methods to show compliance of the products with those requirements. The standards that the product complies with are listed below:
| Brief description of relevant law | Current law |
| Information provided by the manufacturer | |
| Quality management system | |
| Risk management | |
| Testing of medical devices and lifting hoists | |
| Biological assessment of medical devices | |
| Maximum load | Practika and Stand up: 150kg Mini: 130kg |
14.- Manufacturer details
FORTA - FABRICACIONES ORTOPÉDICAS ALBACETE, S.L.
Pq. Emp. Campollano, c/C 90 Nave 1
02007 Albacete
España - Spain
info@fortasl.es
www.fortasl.es
![]() MADE IN EUROPE
MADE IN EUROPE
![]()