
1.- Important
Read the manual carefully before using this product and keep it in case of need.
If you cannot read or understand any warning, caution or instruction, contact the seller before using the product or you may be at risk of harm.
Consult your physician or orthopaedic specialist before use. They will advise you as to the most appropriate walking technique for you.
2.- Icons used on the label and in the manual
 |
Parking brake |  |
On going brake |
 |
Manufacturer details |  |
Date of manufacture |
 |
Medical Device |  |
Observe safety instructions |
 |
Maximum user weight in kg | Declaration of Conformity | |
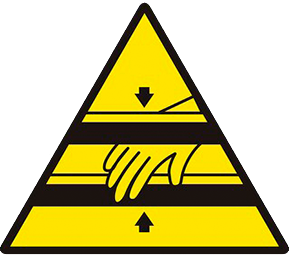 |
Caution, danger of entrapment |  |
Check the user manual |
 |
Product recycling information |  |
Recycling centre |
| SN | Product serial number | LOT | Product batch number |
| REF | Product reference or code |
|
Manufacturer details |
|
Date of manufacture |
|
Medical Device |
|
Observe safety instructions |
|
Maximum user weight in kg |
| Declaration of Conformity | |
|
Caution, danger of entrapment |
|
Check the user manual |
|
Product recycling information |
|
Recycling centre |
| SN | Product serial number |
| LOT | Product batch number |
| REF | Product reference or code |
3.- Product use
Walkers are aids to help people with walking difficulties and assist them to support themselves and keep their balance while walking.
4.- Product description
5.- Warnings and safety
Failure to follow these safety precautions may result in serious injury.
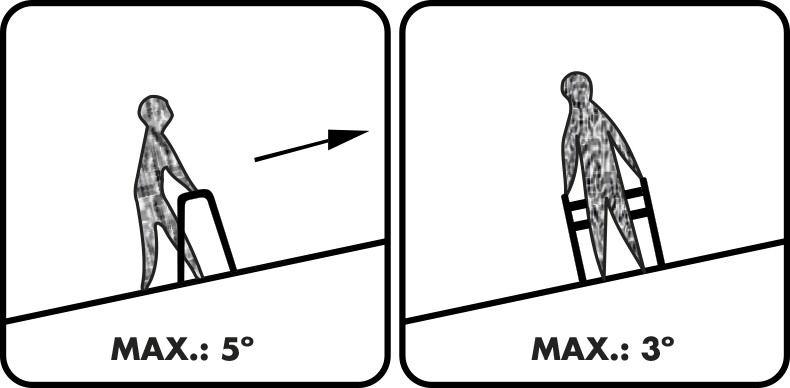
- Indoor walker. Not suitable for use on surfaces that are not level side-to-side.
- If the walker has a basket, do not exceed its maximum weight capacity (3 kg). Loads can only be carried in the basket. Do not place heavy objects on the walker. It might make it unstable.
- Do not exceed the maximum weight capacity of basket of 10 kg. Loads can only be carried in the basket. Do not place heavy objects on the walker. It might make it unstable.
- Make sure all parts are securely fastened and in good working order before using the walker.
- Make sure the walker is completely open and the seat is securely fastened before use.
- Before starting to walk, make sure that the brake lever is disengaged and is not braking the wheels.
- Test the brake lever before using the walker. When the wheels are locked, the rear wheel brake shoe should prevent the wheels from turning.
- Check that when the brake levers are released the wheels can turn freely.
- Always lock the brake levers before sitting down.
- Make sure that the two grips are fixed by the adjustment clip and are both at the same height. Check that the walker is stable before putting your full weight on the handles.
- Make sure that all four legs are secured by the adjustment clip and are all at the same height. Check that the walker is stable before putting your full weight on the handles.
- Do not use the seat when the walker is on sloping or uneven ground. Only use the walker on flat, solid surfaces.
- Replace the wheels and ferrules if they are badly worn or damaged.
- Replace the ferrules if they are badly worn or damaged.
- Do not use the walker to overcome obstacles of a height above 15cm.
- Do not use the walker to overcome sidewalks or kerbs.
- When sitting down or standing up, the user must place both hands on the corresponding handles and ensure that the pressure brakes are engaged and the walker is securely locked.
- Do not move the walker while you or another person is sitting on it. This product is a walking aid and should not be used for transporting anything.
- Check that both sides of the backrest are securely attached to the rollator before use. For this purpose, follow the instructions in section 6 regarding the assembly of the fabric backrest.
- Do not use the walker on stairs or escalators.
- Use only original Forta brand accessories and parts.
- Do not use the walker to walk backwards, in the opposite direction to the direction you are facing.
- Do not make any adjustment or change to the walker while it is in use.
- All wheels and ferrules must be in contact with the ground at all times.
- All ferrules must be in contact with the ground at all times.
- Do not use the walker to mount curbs or sidewalks.
- Do not use the product on wet, icy or snowy inclines.
- If any part is damaged, broken or worn, contact your distributor for a replacement.
6.- Assembly and use
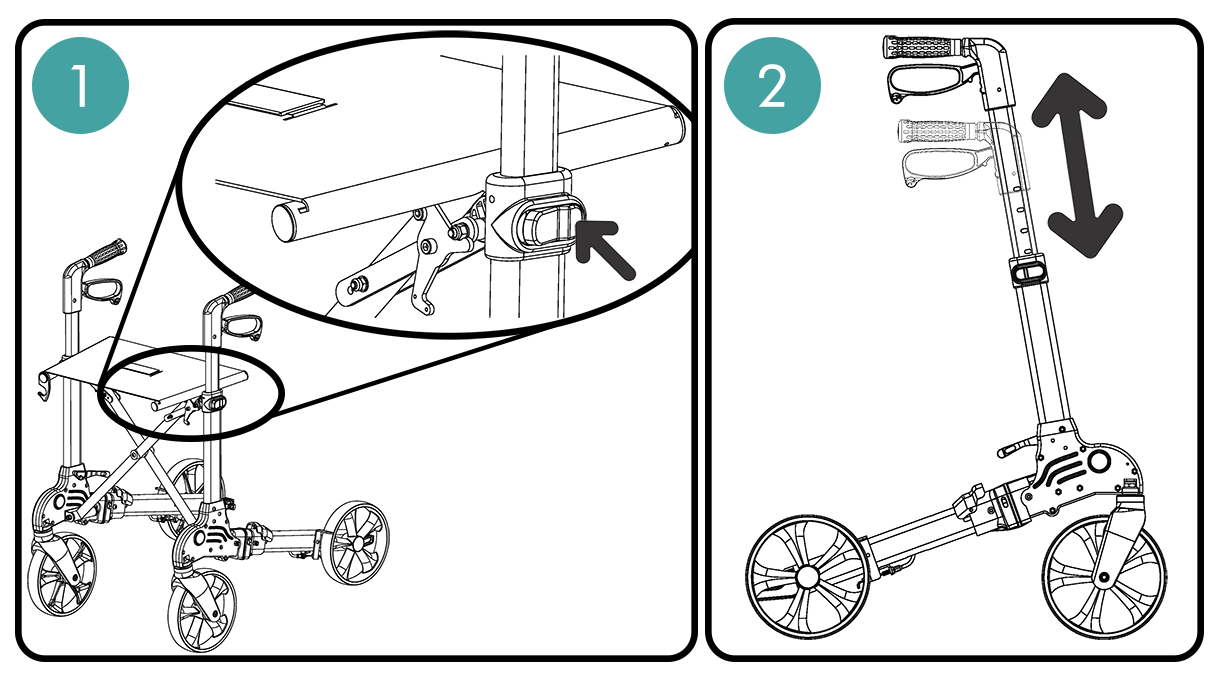
Folding and unfolding of the walker
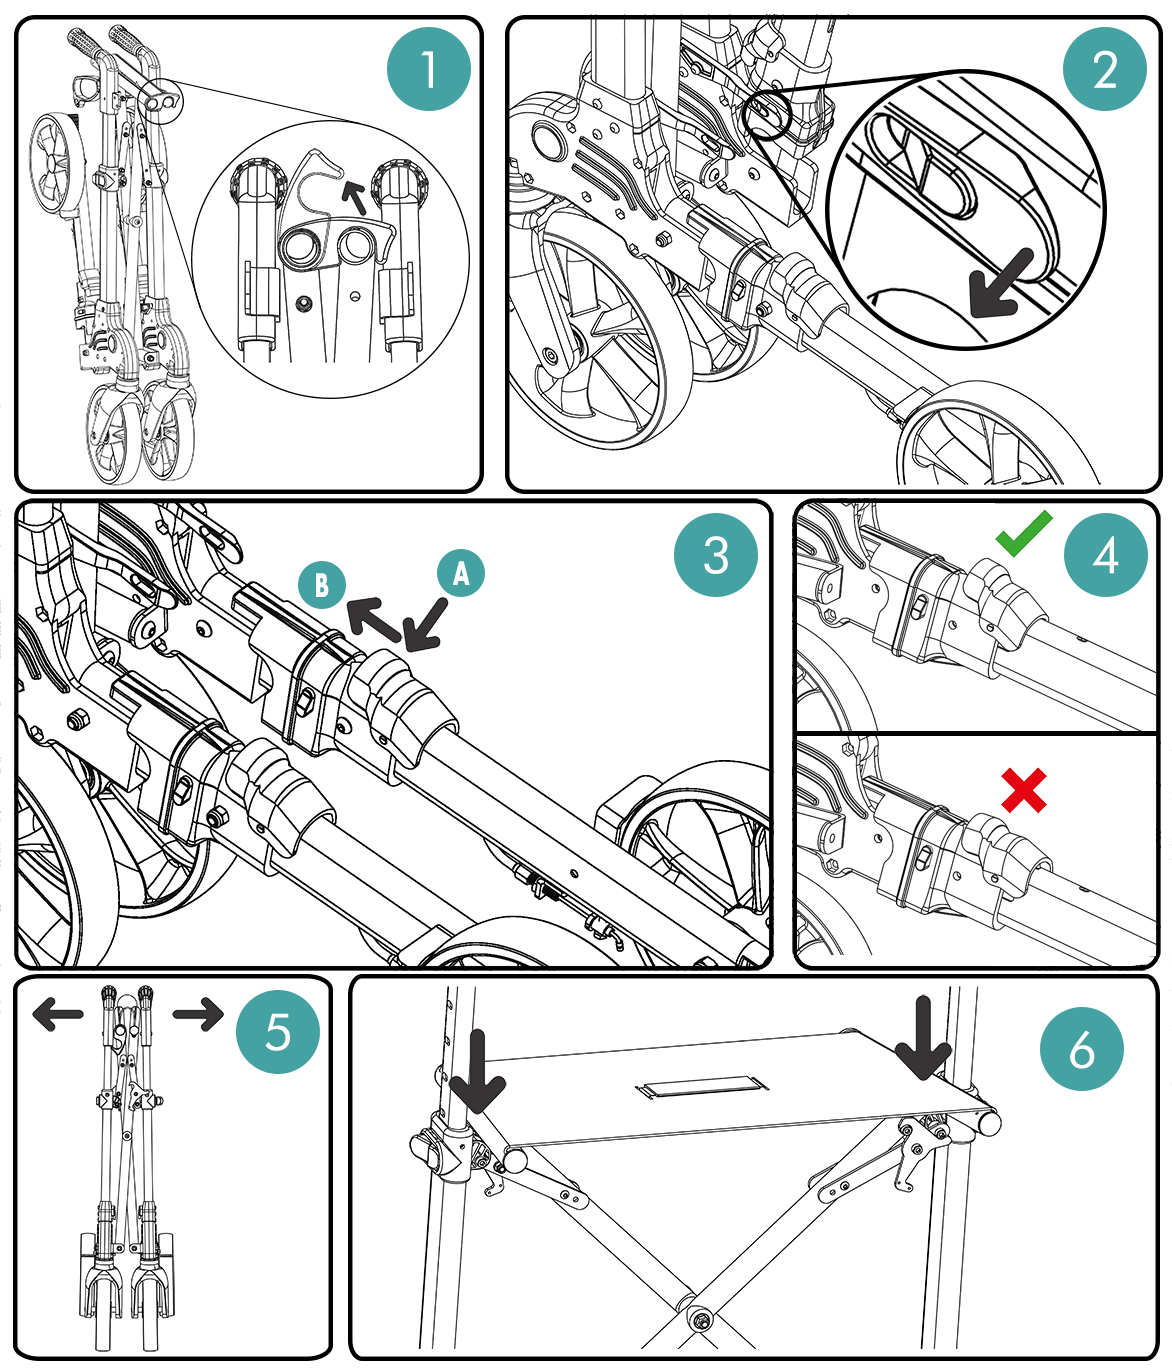
To unfold the walker, follow the instructions below:
- Open the folding hook to allow lateral unfolding.
- Holding the walker by the handler with one hand, release one of the legs by pulling the folding lock outwards.
- Secure the leg with the folding lock by pressing it (A) and, then, pushing it towards the front part of the walker (B).
- Make sure the security leg locking clip is locked. Repeat all previous steps to unfold the other leg.
- Pull from the handles outwards slightly to allow lateral unfolding of the walker.
- Using both hands, push downwards by the lateral bars of the crossbar until you hear a click sound indicating the walker is completely unfolded. Check that pulling the bars upwards the walker does not fold to make sure it is fixed correctly.
To fold the walker, follow the instructions below:
- Pull the strap upwards to unlock the crossbar (A). In case your model does not have a strap, pull up the central part of the seat (C).Then, pull from the lateral bars of the crossbar to fold the walker laterally (B).
- Once the walker is laterally folded, lock it using the locking hook to then securely fold the legs avoiding the unfolding of the walker.
- Release the security leg locking clip pushing it (A) and pulling backwards (B). Make sure the clip is on the right position.
- Pull the leg upwards until you hear a click sound when the leg will lock itself automatically. Repeat the previous step and this one to fold the other leg.
Height adjustment
To adjust the handles height, follow the instructions bellow:
- Push the clip to release the adjustment tube.
- Adjust desired height, the clip will lock itself automatically at each adjustment height.
 <
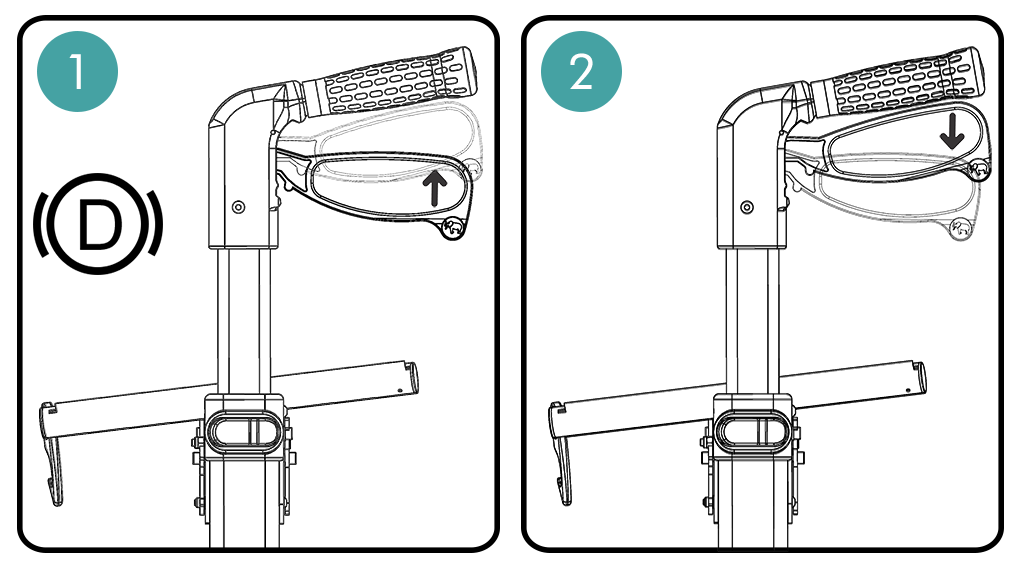
<Brake handle use
Parking braking:
- You must lock the braking system (using the Parking braking) before seating on the walker. To do that, push both brake handles downwards until they lock. The walker will be braked.
- To continue moving, pull both brake handles upwards to release them.
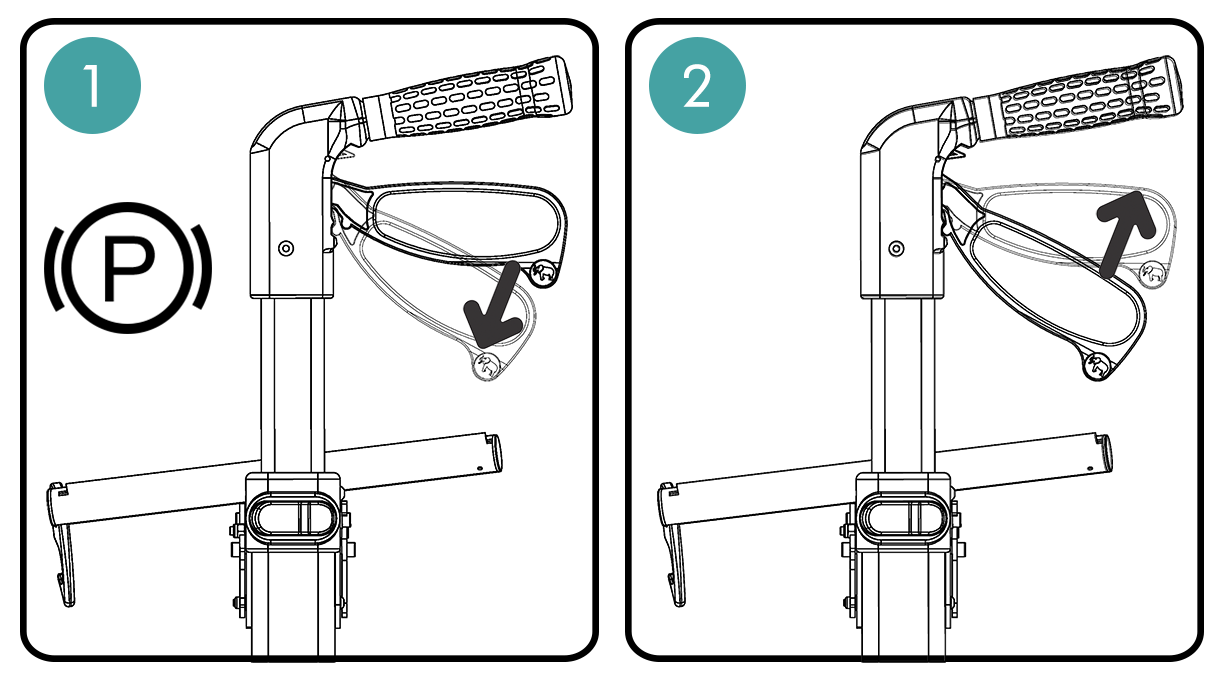
On going braking:
- To brake or reduce speed while moving, push the handles upwards.
- To release simply let go of the handles and the walker will move normally.
Braking system adjustament
This system has an adjustment tensor in each leg (see image). These tensors, with time, must be checked as the cables can lose tension when used. To do that, adjust the nut and make these checks:
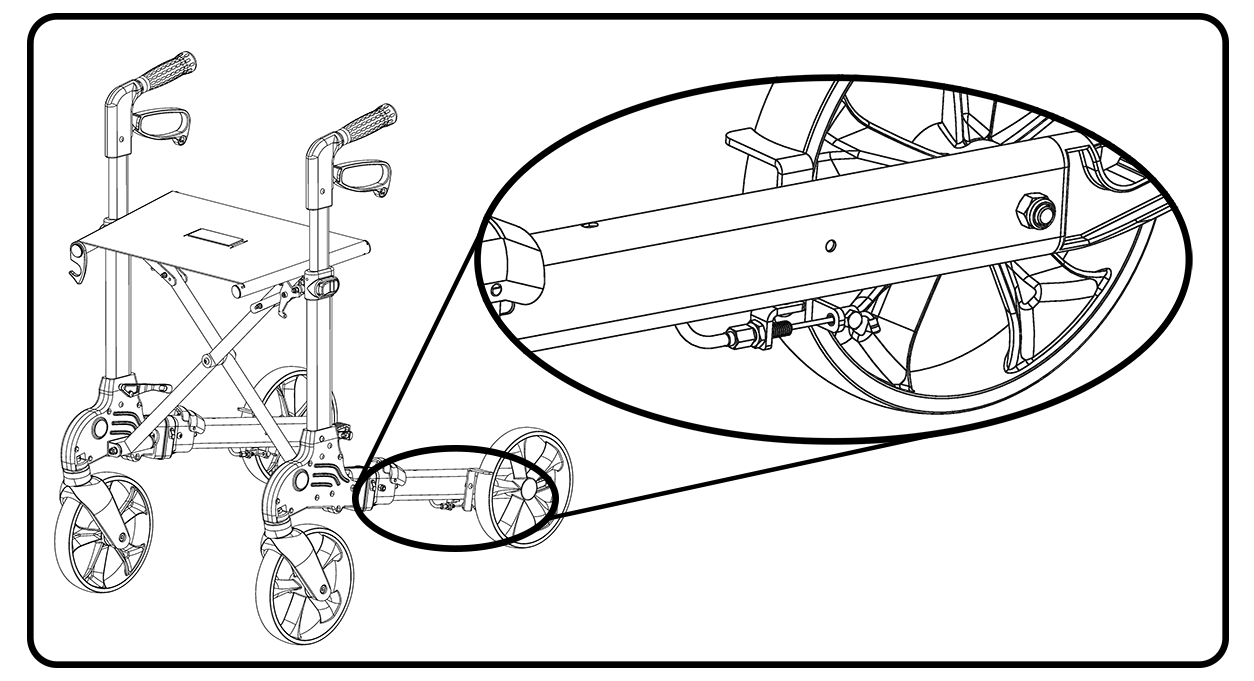
- When using the brakes handles check that the wheels are completely locked, as indicated in the Brake handle use section above.
- To adjust the cable tension, turn the tensor until finding the desired handle tension.
- Check that the piece that locks the wheels, without pushing the handles, is located at a distance from 2 to 4 cm from the surface of the wheel. If not, adjust it to this distance using the tensor. With a wrong adjustment of the braking system there may be wheels locks or lack or braking.
- Make sure the piece that locks the wheels is not damaged or curved as this may cause the malfunctioning of the braking system.
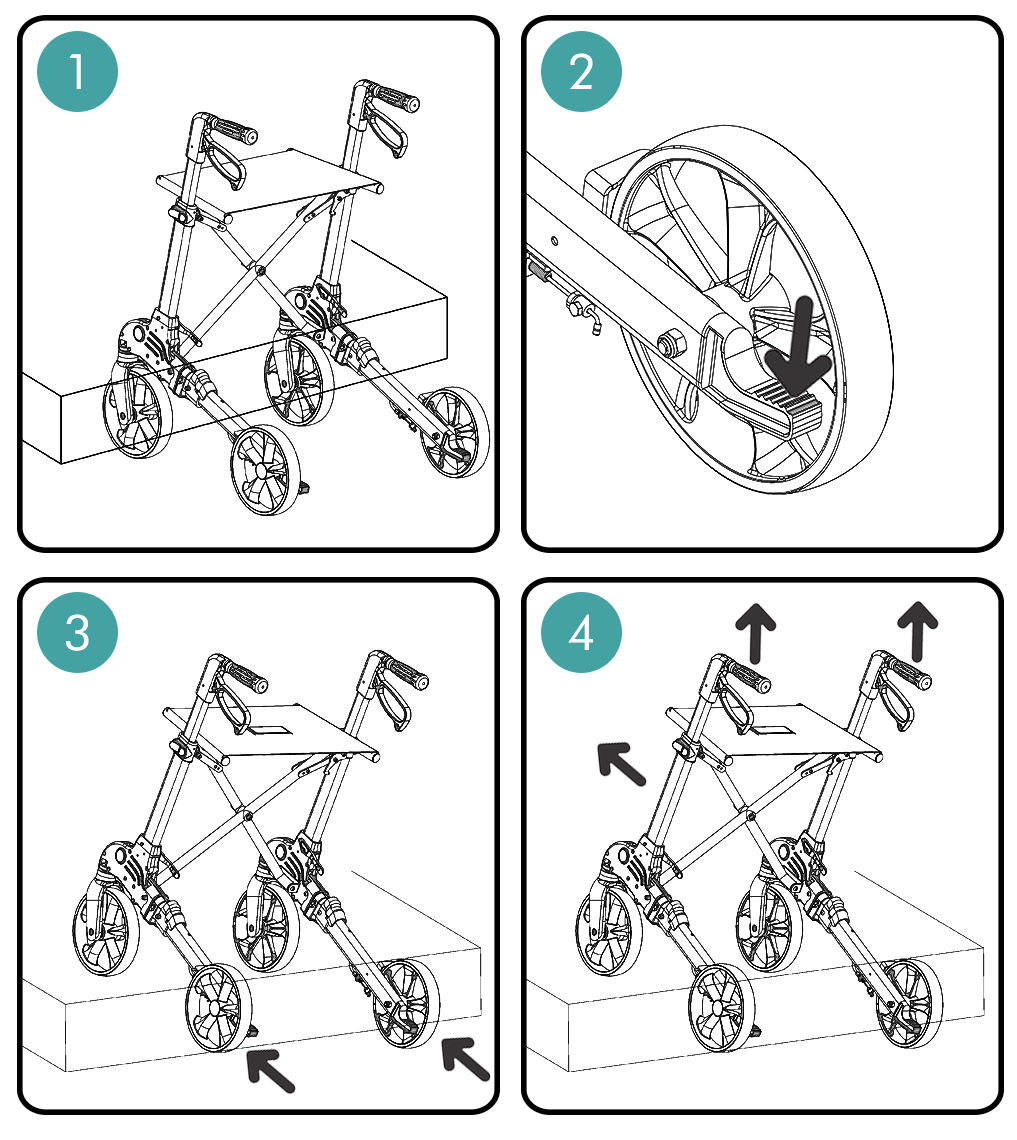
Elevation step pad
Location:
- The elevation step pads are located alongside the rear wheels. The walker has two of these step pads, one on each side.
- When using the step pad, it is important to lean the foot on the rugged part of it to avoid slipping.
Use:
- Before using the step pad, move the walker to get the front wheels as close to the obstacle to overcome as possible.
- Put a foot on the step pad and push to elevate the front wheels above the step. Use the brake handles to control the movement of the walker.
- When the front wheels are on top of the step, push the walker until the rear wheels touch the obstacle to overcome.
- Elevate the walker from the handles, pushing it forward until the rear wheels overcome the obstacle. Again, use the brake handles to control the movement of the walker.
7.- Technical Specifications
Dimensions, load-bearing capacity and weights are listed below:
| HEIGHT | LENGTH | WIDTH | FOLDED LENGTH |
| 850 - 960mm | 610mm | 570mm | 260mm |
| SEAT MEASUREMENTS | HEIGHT TO SEAT | FRONT WHEELS DIAMETER | REAR WHEELS DIAMETER |
| 400x260mm | 550mm | 150mm | 75mm |
| INSIDE WIDTH | WEIGHT | MAXIMUM LOAD |
| 430mm | 4,140kg | 120kg |
8.- Care and maintenance
Failure to care for and maintain the product in perfect condition may lead to the risk of an accident.
- Clean the product regularly with warm water and a soft cloth. Do not use abrasives, detergents or solvents.
- Wipe dry with a clean, soft, dry cloth.
- Make sure there is no build-up of dirt or hair around the axle or wheels.
- Do not use cleaning agents containing phenol or chlorine, which might damage the materials.
- If the wheels squeak, lubricate them with a little oil.
- In the event of a fault, do not repair the walker yourself. Consult an authorised distributor.
9.- Recycling the product
When the product has become unusable and requires disposal, contact your specialist dealer. If you want to recycle it yourself, ask your local waste management company or nearest recycling centre for advice on disposal.
10.- Storing the product
If not correctly stored, the product may be damaged leading to the risk of an accident.
- Do not store this product for an extended period of time near a heat source or in the sun (e.g. in front of a window or near a radiator) or near a cold source.
- Keep the product away from flames and sparks.
- Store the product as follows:
- Store the product in a dry, cool place.
- Protect the product from dust and rust by packaging or bagging it.
- Store all removed parts or components together in one place so they do not get mixed up with anything else or get lost.
- Do not place any weight on any components (do not place heavy objects on the product or on any component).
11.- Useful life
The expected useful life of the product is 1 year in normal conditions of use, safety and maintenance. After that time, the product can be used as long while it remains in perfect conditions of use and maintenance. Some parts or components may in any event have to be replaced due to normal wear and tear within less than this time.
12.- Warranty and after-sales service
Warranty terms and conditions:Only original Forta products purchased from authorised dealers are covered by the warranty against defects in parts and workmanship.
The warranty runs from the date of purchase for 3 years for structure and components subject to the following conditions:
- Only original FORTA products purchased from authorised dealers will be covered by the warranty against defects in parts and workmanship.
- The purchasing establishment must give notice of any defect in the product immediately.
- The manufacturer will not have any liability for defects caused by improper handling, negligence or failure to follow the instructions set out in this manual.
- During the warranty period, any part that proves defective due to faulty assembly or materials will be repaired or replaced free of charge by Forta.
- The warranty will be absolutely void if incorrect modifications or adjustments are made to the product or if parts or options not supplied for the product model are fitted.
- Damage from rust caused by misuse or negligence or the action or any liquid or gas that may damage the product are excluded from the warranty.
THE WARRANTY DOES NOT COVER THE CONSEQUENCES OF ANY TRAVEL PROBLEM, IN PARTICULAR ISSUES RELATING TO TRANSPORT, LOSS OF PROFIT, EXPENSES, ETC.
Forta will have NO liability in the following circumstances:
- Normal wear and tear of the product or inappropriate or incorrect use.
- Defects in any assembly or repair carried out by the purchaser or a third party.
- Negligent handling or maintenance or use of unsuitable parts.
- Repairs or modifications carried out in non-official workshops.
- Forta will have no liability for any harm or loss suffered by the user or any third party as a result of any modification to or alteration of any product.
- The warranty also excludes modifications made other than with original Forta parts.
The warranty certificate must be sent to FORTA, S.L. together with a photocopy of the purchase invoice within 15 days from the date of purchase. To validate the warranty, the user must submit the warranty certificate bearing the stamp the seal of the outlet that sold the product. You can download the warranty certificate here: https://www.fortasl.es/manuals/doc/GARANTIA%20CONTRACTUAL.pdf.
13.- Tests and trials carried out
FORTA products comply with Annex IV to MDR (EU) , are CE marked and have been designed and tested in accordance with . Forta is obliged to certify compliance by its products with a number of essential requirements. There is a standard that specifies the inspection and testing methods to show compliance of the products with those requirements. The standards that the product complies with are listed below:
| Brief description of relevant law | Current law |
| Information provided by the manufacturer | |
| Quality management system | |
| Risk management | |
| Testing of medical devices and walkers | |
| Biological assessment of medical devices | |
| Maximum load |
14.- Manufacturer details
FORTA - FABRICACIONES ORTOPÉDICAS ALBACETE, S.L.
Pq. Emp. Campollano, c/C 90 Nave 1
02007 Albacete
España - Spain
info@fortasl.es
www.fortasl.es
![]() MADE IN EUROPE
MADE IN EUROPE
![]()